When we look at how Docker images are layered, it raises questions about how they are stored. Take a Node application as an example: it’s built on top of a base image (node), and then several steps are added to create the final application image.

# Dockerfile

# Use the official node:24.4 image as the base image
FROM node:24.4

# Create the directory where the application will reside
RUN mkdir -p /home/app/

# Set the working directory for subsequent commands
WORKDIR /home/app/

# Copy package dependency file to the working directory
COPY source/package.json /home/app/

# Install the application dependencies specified in the package.json
RUN npm install

# Define how to run the application
CMD ["node", "application.js"]

# Copy all files from the "source" folder on the host to the working directory in the image
COPY source/* /home/app/
Before building our image, let’s first see where Docker actually stores its images. On macOS, they’re located under ~/Library/Containers/com.docker.docker/Data/, and on Linux under /var/lib/docker. We can even check how much space is being used before pulling any images by running du -shc.

Next, we can check the disk usage again — first after downloading the base image node:24.4, and then after building our own image on top of it.
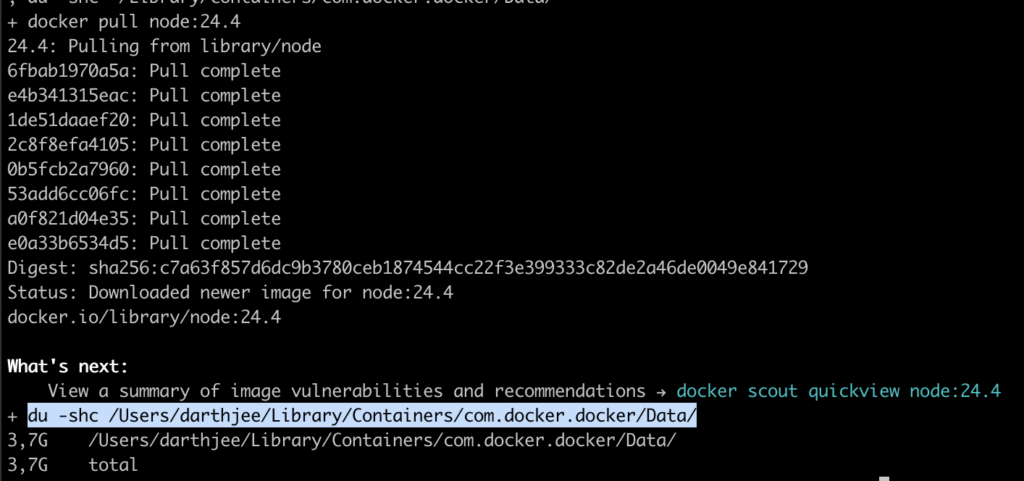
We can see that the disk usage went from 2.7GB to 3.7GB — an increase of roughly 1GB, which matches the size of the node:24.4 base image (1.13GB), aside from minor rounding differences and extra data that is also stored.
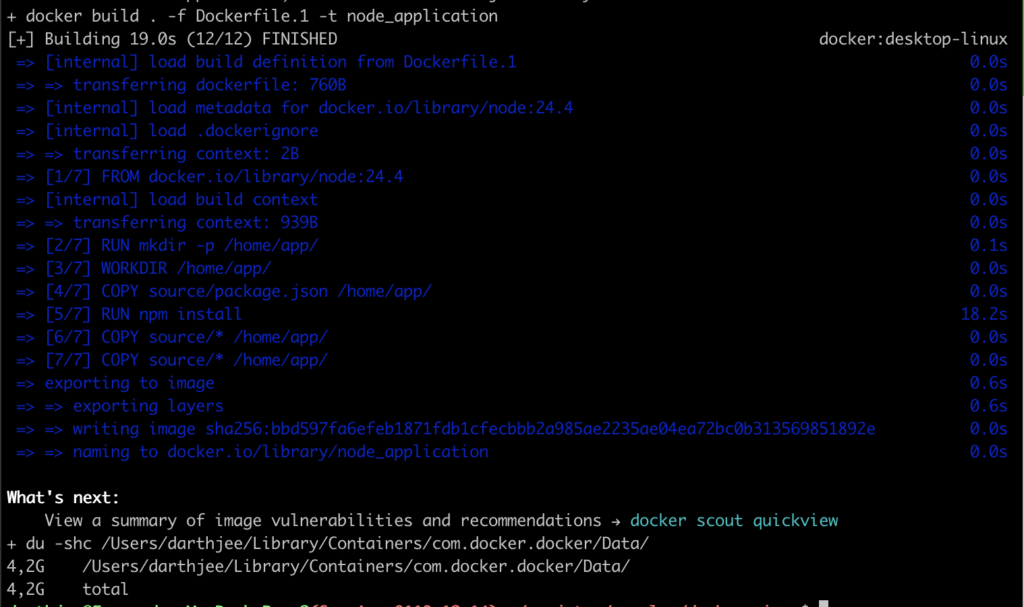
When we build our application image, disk usage goes from 3.7GB to 4.2GB — an increase of about 0.5GB. This is less than the full size of the image (1.43GB) because the system only needs to store the new layers; the application image reuses the base node image layers already on disk. You can see this more clearly by running docker history node_application.


Now let’s look at a second application. It’s very similar to the first one, but there’s a small difference in its package.json. That change prevents Docker from using the cache for that step, forcing it to create a completely new image layer, which means the usage in the file system will increase due to the dependency installation step, as it can be seen again by running `docker history node_application-2
# Dockerfile

# Use the official node:24.4 image as the base image
FROM node:24.4

# Create the directory where the application will reside
RUN mkdir -p /home/app/

# Set the working directory for subsequent commands
WORKDIR /home/app/

# Copy package dependency file to the working directory
COPY second_source/package.json /home/app/

# Install the application dependencies specified in the package.json
RUN npm install

# Define how to run the application
CMD ["node", "application.js"]

# Copy all files from the "source" folder on the host to the working directory in the image
COPY second_source/* /home/app/
In summary, the base Node image takes up 1.13 GB, and the two application images each add about 0.4 GB. This extra space is needed because their dependencies aren’t exactly the same — even though they share roughly 99% of them.

One possible approach (not a full solution, but a step in the right direction) is to start with the image that has the fewest dependencies and use it as the base for the one with more. In our case, the second image had one less dependency than the first, so we could create a new Dockerfile using the package.json from the first image, but building it on top of the second image.
# Dockerfile

# Use previoulsly built image as the base image
FROM node_application-2

# Copy package dependency file to the working directory
COPY source/package.json /home/app/

# Install the application dependencies specified in the package.json
RUN npm install

# Copy all files from the "source" folder on the host to the working directory in the image
COPY source/* /home/app/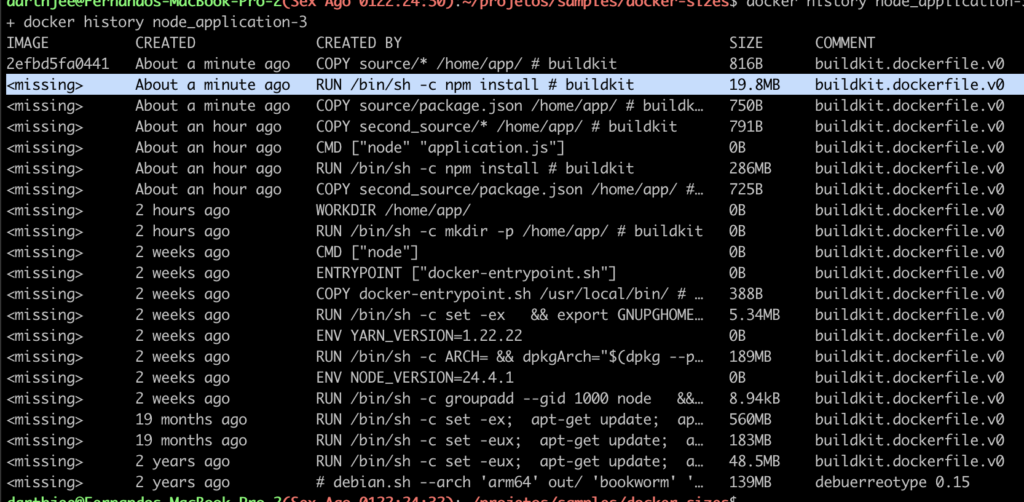
As can be seen, the new run of npm install only adds the missing dependencies, creating a much smaller layer. This way, you only need storage for the node base image, plus the extra layers for the smaller application’s dependencies, and finally a thin layer for the last application, which just adds a few more packages.

This approach introduces a small issue: the base image already contains an application.js file, which gets replaced in the new image. That’s negligible when dealing with small files, but it can become a serious problem with larger ones — as we’ll demonstrate in the next example. In that scenario, we use the application as the base image and repeatedly remove and reinstall the package dependencies.
# Dockerfile

# Use previoulsly built image as the base image
FROM node_application

# Remove and reinstall the packages dependencies
RUN rm -rf /home/app/node_modules; npm install

# Remove and reinstall the packages dependencies ... again
RUN rm -rf /home/app/node_modules; npm install

# Remove and reinstall the packages dependencies ... again
RUN rm -rf /home/app/node_modules; npm install

In this example, the new image node_application-4 has the same content as node_application, but ends up larger in size. The extra weight comes from the last three layers, where dependencies are removed and added again. This illustrates that changing a file in a Docker image doesn’t delete the old version — instead, it creates a new layer with the updated file, which increases the overall image size.
As a rule of thumb, you can save disk space by installing common dependencies in base images — but be aware that space can be wasted when those dependencies are later removed or updated in child images.
Leave a Reply